
Steps for preparing a Word Document
1. View – While working with a document, always Set the View to Print Layout for better control
2. Page Layout – Set the Orientation and Margins appropriate to contents of your document 3. Ruler – Keep the Rulers On to track the printable area and Indents / Tabs of paragraphs
4. Alignment – Always keep the alignment Left to start with, you can always modify it later
5. Font – Select the Font and Font Size relevant to your contents and layout
6. Color – The default color for all the text should be set to Automatic, i.e. Black
7. Type – Start typing with Bold, Italics and Underline turned Off.
Once the typing is finished, we can start with formatting the document.
Notes
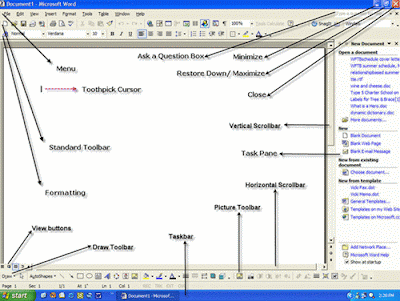
· Refer the picture for the look and feel of typical MS Word Window and its components
· The words in Bold / Italics are the menu / command options from MS Word.
· Refer the picture for the look and feel of typical MS Word Window and its components
· The words in Bold / Italics are the menu / command options from MS Word.
All the best!
No comments:
Post a Comment